• Post category:Intermédiaire
  • Commentaires de la publication :0 commentaire
  • Dernière modification de la publication :mars 13, 2022
  • Temps de lecture :9 min de lecture

Allumer 4 Leds indépendamment grace à 4 boutons type télérupteur avec un Arduino

Niveau APPRENTISSAGE :   Intermédiaire


    Prérequis :

Matériel :

  • 1 x Carte Arduino
  • 4 x Résistances 220 ohms
  • 4 x Leds
  • 4 x Boutons
  • Fils de connexion
  • 1 x Breadboard

Version IDE :


Vidéo de démonstration :


Schéma de câblage :


Code :

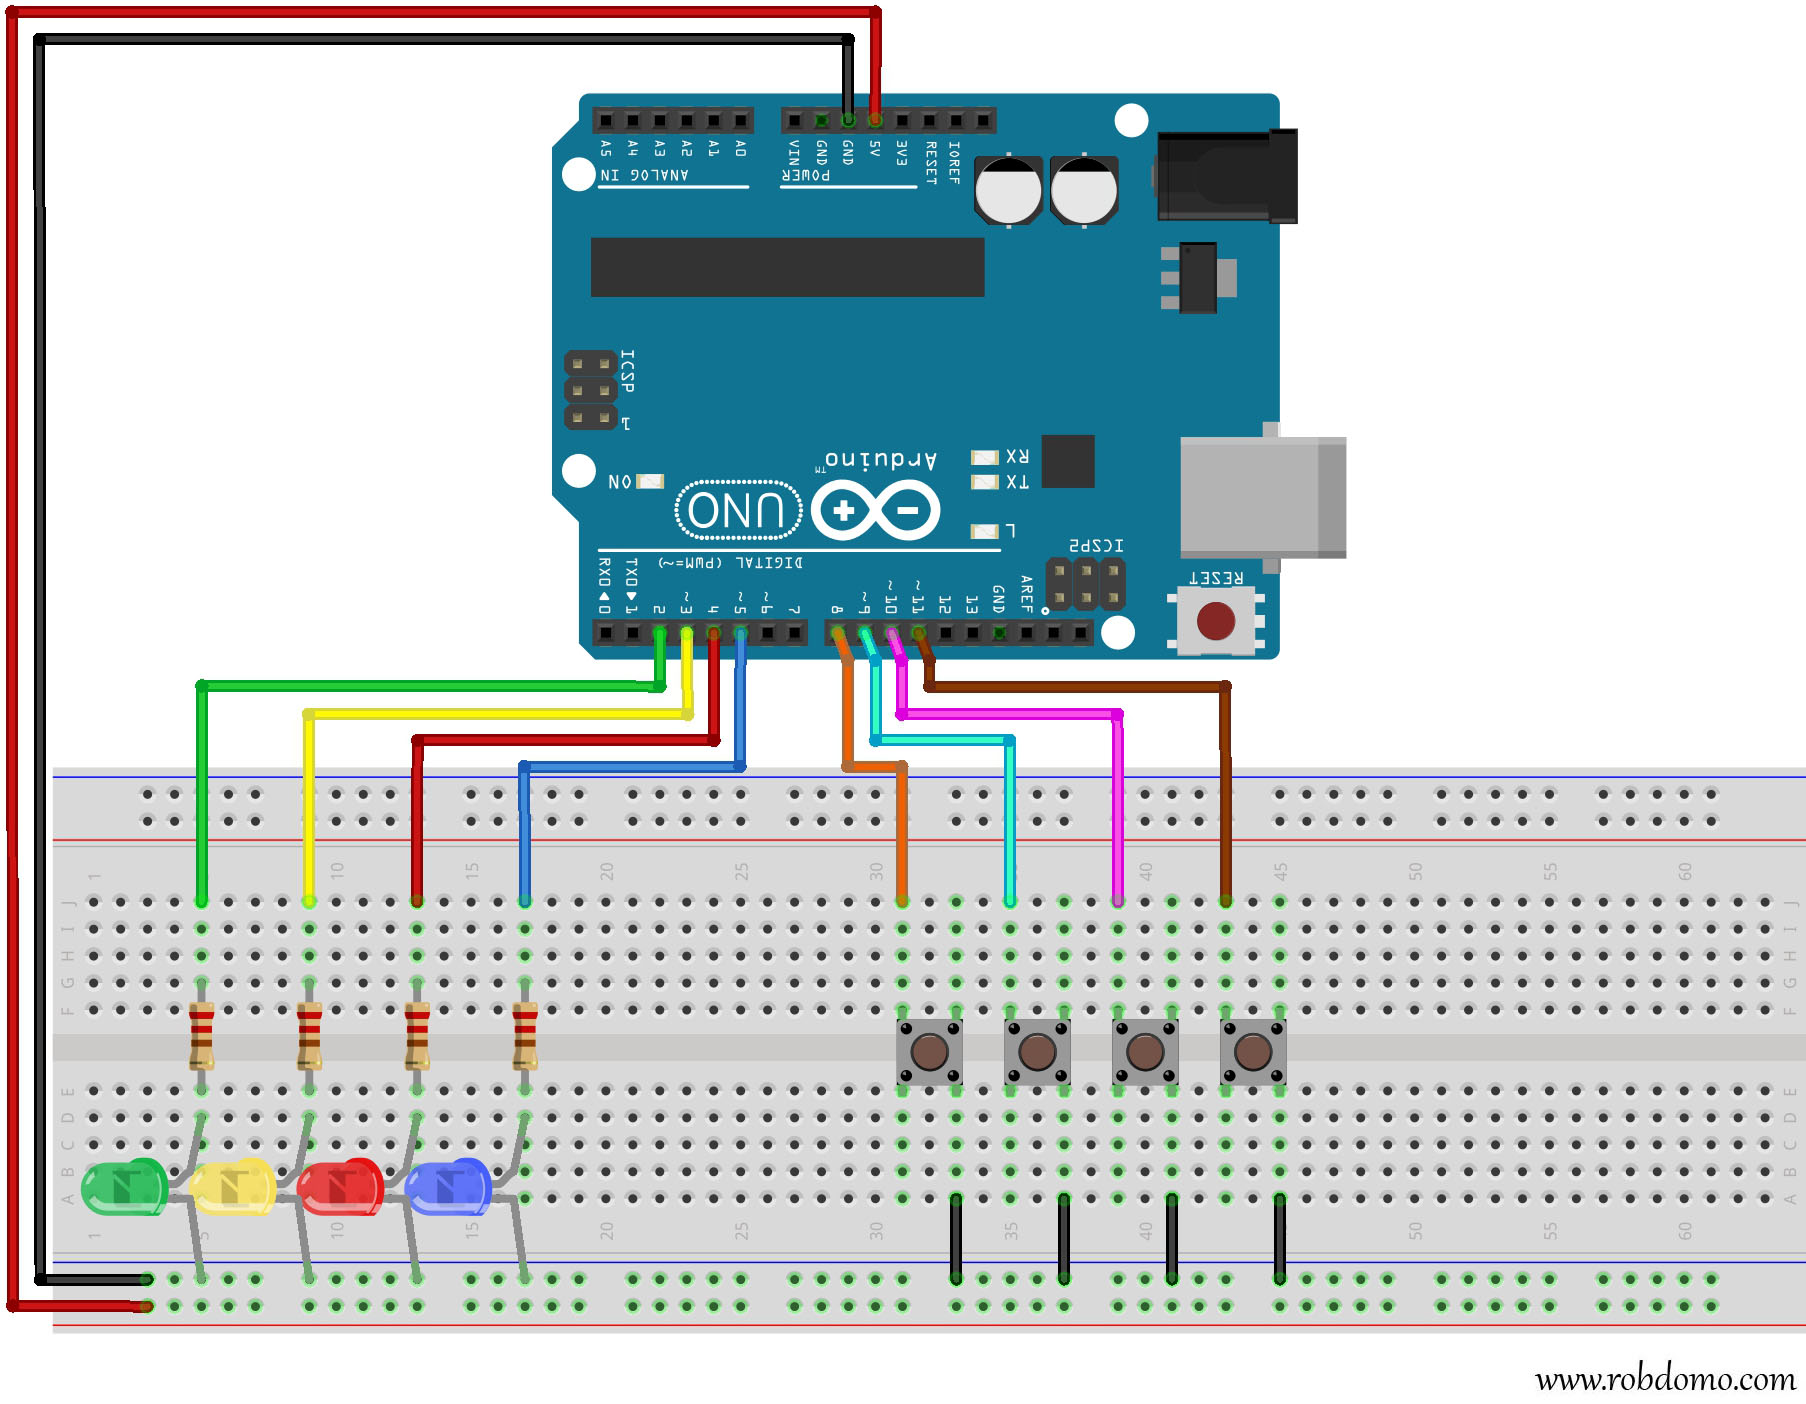
//////////////////Bouton 1 Ledverte //////////////////////
// La broche numérique 8 est reliée au bouton1. On lui donne le nom bouton1.
int bouton1 = 8;
// La broche numérique 2 est reliée à la led verte. On lui donne le nom Ledverte.
int Ledverte = 2;
// Déclaration variable EtatLedverte qui va servir à stocker une valeur au format bool soit LOW ou HIGH.
bool EtatLedverte;

//////////////////Bouton 2 Ledjaune //////////////////////
int bouton2 = 9;
int Ledjaune = 3;
bool EtatLedjaune;

//////////////////Bouton 3 Ledrouge //////////////////////
int bouton3 = 10;
int Ledrouge = 4;
bool EtatLedrouge;

//////////////////Bouton 4 Ledbleu //////////////////////
int bouton4 = 11;
int Ledbleu = 5;
bool EtatLedbleu;

void setup() {
//////////////////Bouton 1 Ledverte //////////////////////
// Définit Ledverte comme sortie.
pinMode(Ledverte, OUTPUT);
// Faire de la broche du bouton1 une entrée avec activation de la résistance de rappel interne de l'ARDUINO .
pinMode(bouton1, INPUT_PULLUP);

//////////////////Bouton 2 Ledjaune //////////////////////
pinMode(Ledjaune, OUTPUT);
pinMode(bouton2, INPUT_PULLUP);

//////////////////Bouton 3 Ledrouge //////////////////////
pinMode(Ledrouge, OUTPUT);
pinMode(bouton3, INPUT_PULLUP);

//////////////////Bouton 4 Ledbleu //////////////////////
pinMode(Ledbleu, OUTPUT);
pinMode(bouton4, INPUT_PULLUP);
}

void loop() {

//////////////////Bouton 1 Ledverte //////////////////////
// Lit la broche d'entrée du bouton1 et stock ça valeur dans EtatBouton1 au format bool
bool EtatBouton1 = digitalRead(bouton1);
// Si EtatBouton1 == LOW on exécute les actions entre {}
if (EtatBouton1 == LOW) {
// Inverce la valeur "!" EtatLedverte et la re stock dans EtatLedverte
EtatLedverte = !EtatLedverte;
// Met la broche numérique stockée dans Ledverte soit 2 à la valeur de EtatLedverte
digitalWrite(Ledverte, EtatLedverte);
// Tant que EtatBouton1 == LOW on répète les actions entre {}
while (EtatBouton1 == LOW) {
// Lit la broche d'entrée du bouton1 et stock ça valeur dans EtatBouton1
EtatBouton1 = digitalRead(bouton1);
}
}

//////////////////Bouton 2 Ledjaune //////////////////////
bool EtatBouton2 = digitalRead(bouton2);
if (EtatBouton2 == LOW) {
EtatLedjaune = !EtatLedjaune;
digitalWrite(Ledjaune, EtatLedjaune);
while (EtatBouton2 == LOW) {
EtatBouton2 = digitalRead(bouton2);
}
}

//////////////////Bouton 3 Ledrouge //////////////////////
bool EtatBouton3 = digitalRead(bouton3);
if (EtatBouton3 == LOW) {
EtatLedrouge = !EtatLedrouge;
digitalWrite(Ledrouge, EtatLedrouge);
while (EtatBouton3 == LOW) {
EtatBouton3 = digitalRead(bouton3);
}
}

//////////////////Bouton 4 Ledbleu //////////////////////
bool EtatBouton4 = digitalRead(bouton4);
if (EtatBouton4 == LOW) {
EtatLedbleu = !EtatLedbleu;
digitalWrite(Ledbleu, EtatLedbleu);
while (EtatBouton4 == LOW) {
EtatBouton4 = digitalRead(bouton4);
}
}
}


Simulation TINKERCAD :


+ Infos sur le langage utilisé :

1. Fonctions
2. Variables
3. Stucture


Laisser un commentaire